::NAV BAR::

home about contact

Tuesday, 6 September 2011

Fabric Roll Case


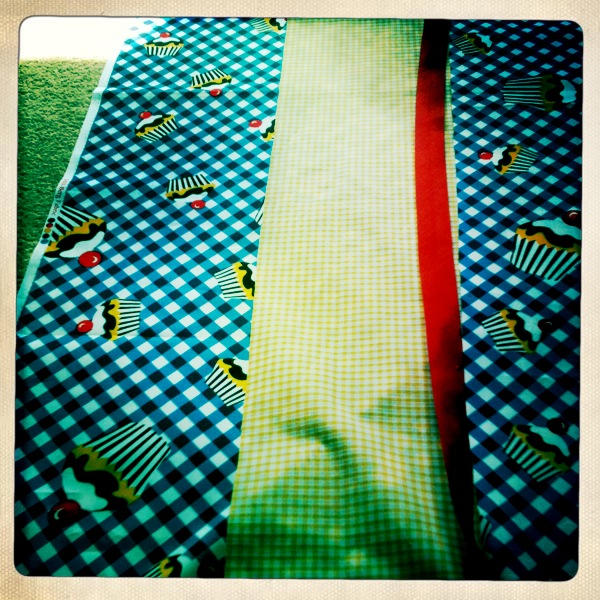
My Mum creates the most amazing cakes and sugar design. She attends cake decorating classes every week and has to carry a large tool box with her. I had the idea of making her a fabric roll case to carry the tools she needs for classes. I applied the same idea as a knitting needle case, different size pockets for her tools sewn into the fabric. I chose some cupcake fabric and a yellow gingham as a contrast fabric. I also chose some red bias binding to compliment the cherry on the cupcakes. I miss calculated how much I needed so I didn't have enough for the edge of the case. I made my own yellow gingham bias tape with the left over fabric I had and I was really pleased with the results.

Making Bias tape: Measure the width you would like for your deign and double that to allow for folds. Cut the fabric and then iron out the creases. Fold the fabric in half and iron the entire strip, fold both edges into the centre and iron again. The bias tape is now ready to use.

The roll case is made up of two large rectangular pieces of cupcake fabric, one medium gingham rectangle and a smaller rectangle. The compartment side is made from one of the large rectangles and the medium and small rectangle. I attached the bias binding to the medium and small pieces and sewed them on using my sewing machine.
Once the bias was done I pinned both pieces to the large cupcake fabric and then began to sew straight lines to create the compartments. I wanted them to be various sizes for different cake tool. I made two larger compartments for tracing paper and piping bags. I didn't encounter any problems as both fabrics had grids to follow for lovely straight lines.
The front of the case is made up of a large piece of cupcake fabric and a strip of gingham fabric with the red bias tape running down the middle. I stitched the ribbon under the bias tape to make sure the join looked neat.
I pinned the two large pieces back to back and attached the bias tape. I sewed along the bias tape and then ironed the case to finish it off.

I presented the Roll case to my Mum for her birthday and she was really pleased with it. I was really happy with the finished result and I would like to make more.


Tuesday, 30 August 2011

My Dress Disaster!

This week I have been working on a new dress which took a turn for the worst. The pattern I used was from the1980's and I knew that the dress could be a little dated. I carried on and everything was going really well. I found some awesome fabric which I thought would give the dress a new identity. My sewing was perfect and I followed the patterns instructions carefully, but once the dress was done it looked rather odd. The cut of the dress isn't flattering in the slightest and I was extremely disappointed.

I have decided to take the dress apart, fix the pattern myself and make the dress flattering to the female form. I am going to take the skirt up, take in the back panels and shorten the waist. I hope these steps will save my dress from the scrap fabric bin! I will not fail!

Ok, so far my dress hasn't gone to plan but if at first you don't succeed, try, try again.


Tuesday, 23 August 2011

Vintage Apron

A few months ago I purchased a vintage apron pattern from eBay. I though it would be an exciting project for me to take on in my spare time. I had different fabrics running through my head with vintage flourishes to add individuality.


The first fabric that came to mind was gingham because it's classic and its very much 'in' these days. I took a trip to my favourite fabric shop in Brighton. The Fabric Shop is the cheapest shop I have found in Brighton, everyone is extremely friendly and it's great value for money. I managed to get my gingham a few pennies cheaper than C&H. I had a look around and took a fancy to some red gingham. I wanted a different fabric for contrast and I was looking around for ages before I spotted a lovely denim fabric. The combination of the gingham and the denim fabric is so Americana that I couldn't resist! I purchased my fabric and I was off to create my vintage apron.


I sketched out a few ideas and my favourite design was a classic heart theme so that's what I went with. I had a few challenges when making my apron. Firstly I couldn't afford bias tape so I had to make my own. I cut out strips of fabric and ironed it to form the folds. I was really proud of what I had achieved because I didn't take the lazy option ;-)  I am extremely happy with my apron and I can't take it off! I love it!


New Corsages!


Doll Doll Dolly Projects

Doll Doll Dolly Bunting! 
I spend an awful amount of time making corsages and I felt like I needed a break from the norm. I decided to make some bunting for my stall for the Cally festival. http://thecallyfestival.com/thecallyfestival/about


I went into the fabric shop not really knowing what fabrics I wanted, but when I saw these matching polka dot fabrics I was sold. My stalls always have a girlie vibe with a vintage flair.  I think its important to display your  product well and make it clear what you're all about


I begun by making a stencil so all the triangles would be the same size. I made letter stencils and pinned them to the fabric for cutting. I was ready to go! I really liked the idea of creating texture, so I added lots of crazy rough stitching using my sewing machine. The colours looked really pretty and I was really excited to see the finished product. I sewed the bunting together, attached the bias tape and then ironed out the creases. Ta Da! The bunting went down really well at the Cally Festival which made my day. 


Monday, 6 June 2011

Exciting News! Doll Doll Dolly at Revolt!


For the last month i have been working really hard getting ready for Revolt. I believe i cut out over 500 petals which was extremely dull and repetitive work! The fun begins when you construct the corsage and decorate with buttons or beads.

I believe i made about 20 new corsages and hair slides for the event. I wanted a little more variety to appeal to the girls attending Revolt. I used skull and anchor buttons to adorn my corsages to add a little fun and indivduality. I really love the shocking pink Mexican inspired fascinator because of its bright colour and pink pearl eyes. I made a smaller version as the bigger one is more for a special occasion.

I made quite as few leopard print Corsages with 'Love' velvet buttons as i know they’re popular with my friends. The girls at Revolt all commented on how much they loved the leopard print corsage. I think i need to make variations of this design for the day and evening.


Friday, 20 May 2011

Vintage Aprons!

 
In my last post i wrote about buying my vintage pattern. I thought i would share some photographs and details from the pattern sleeve.

Misses' And Women's Apron with Detachable Bib: Apron skirt is gathered to the waistband; a band lower edge forms two pickets. Detachable bib buttons to inside of waistband. Contrast binding details bib and band. Tie ends fasten with bow in back. Extra fabric is required for matching plaids, striped and one-way design fabrics.

Suggested fabric types- All views Cottons and Blends: Chambray, broadcloth, poplin, denim, chintz, dimity, leno weaves, organdy. Rayon’s silks, and synthetics.